
Great King Rat was a dirty old man
And a dirty old man was he
Great King Rat - Queen
Hello Oathsworn, Friends of the Caesura!
Today's post is a monumental one. As I write this, I have just finished popping my logo on all FIFTY SEVEN photos! I would usually have split a post as mammoth as this one into 3 separate posts, so as not to overwhelm you, dear reader; but I want to keep the Oathsworn momentum going while the buzz from the recently funded Kickstarter is still active.
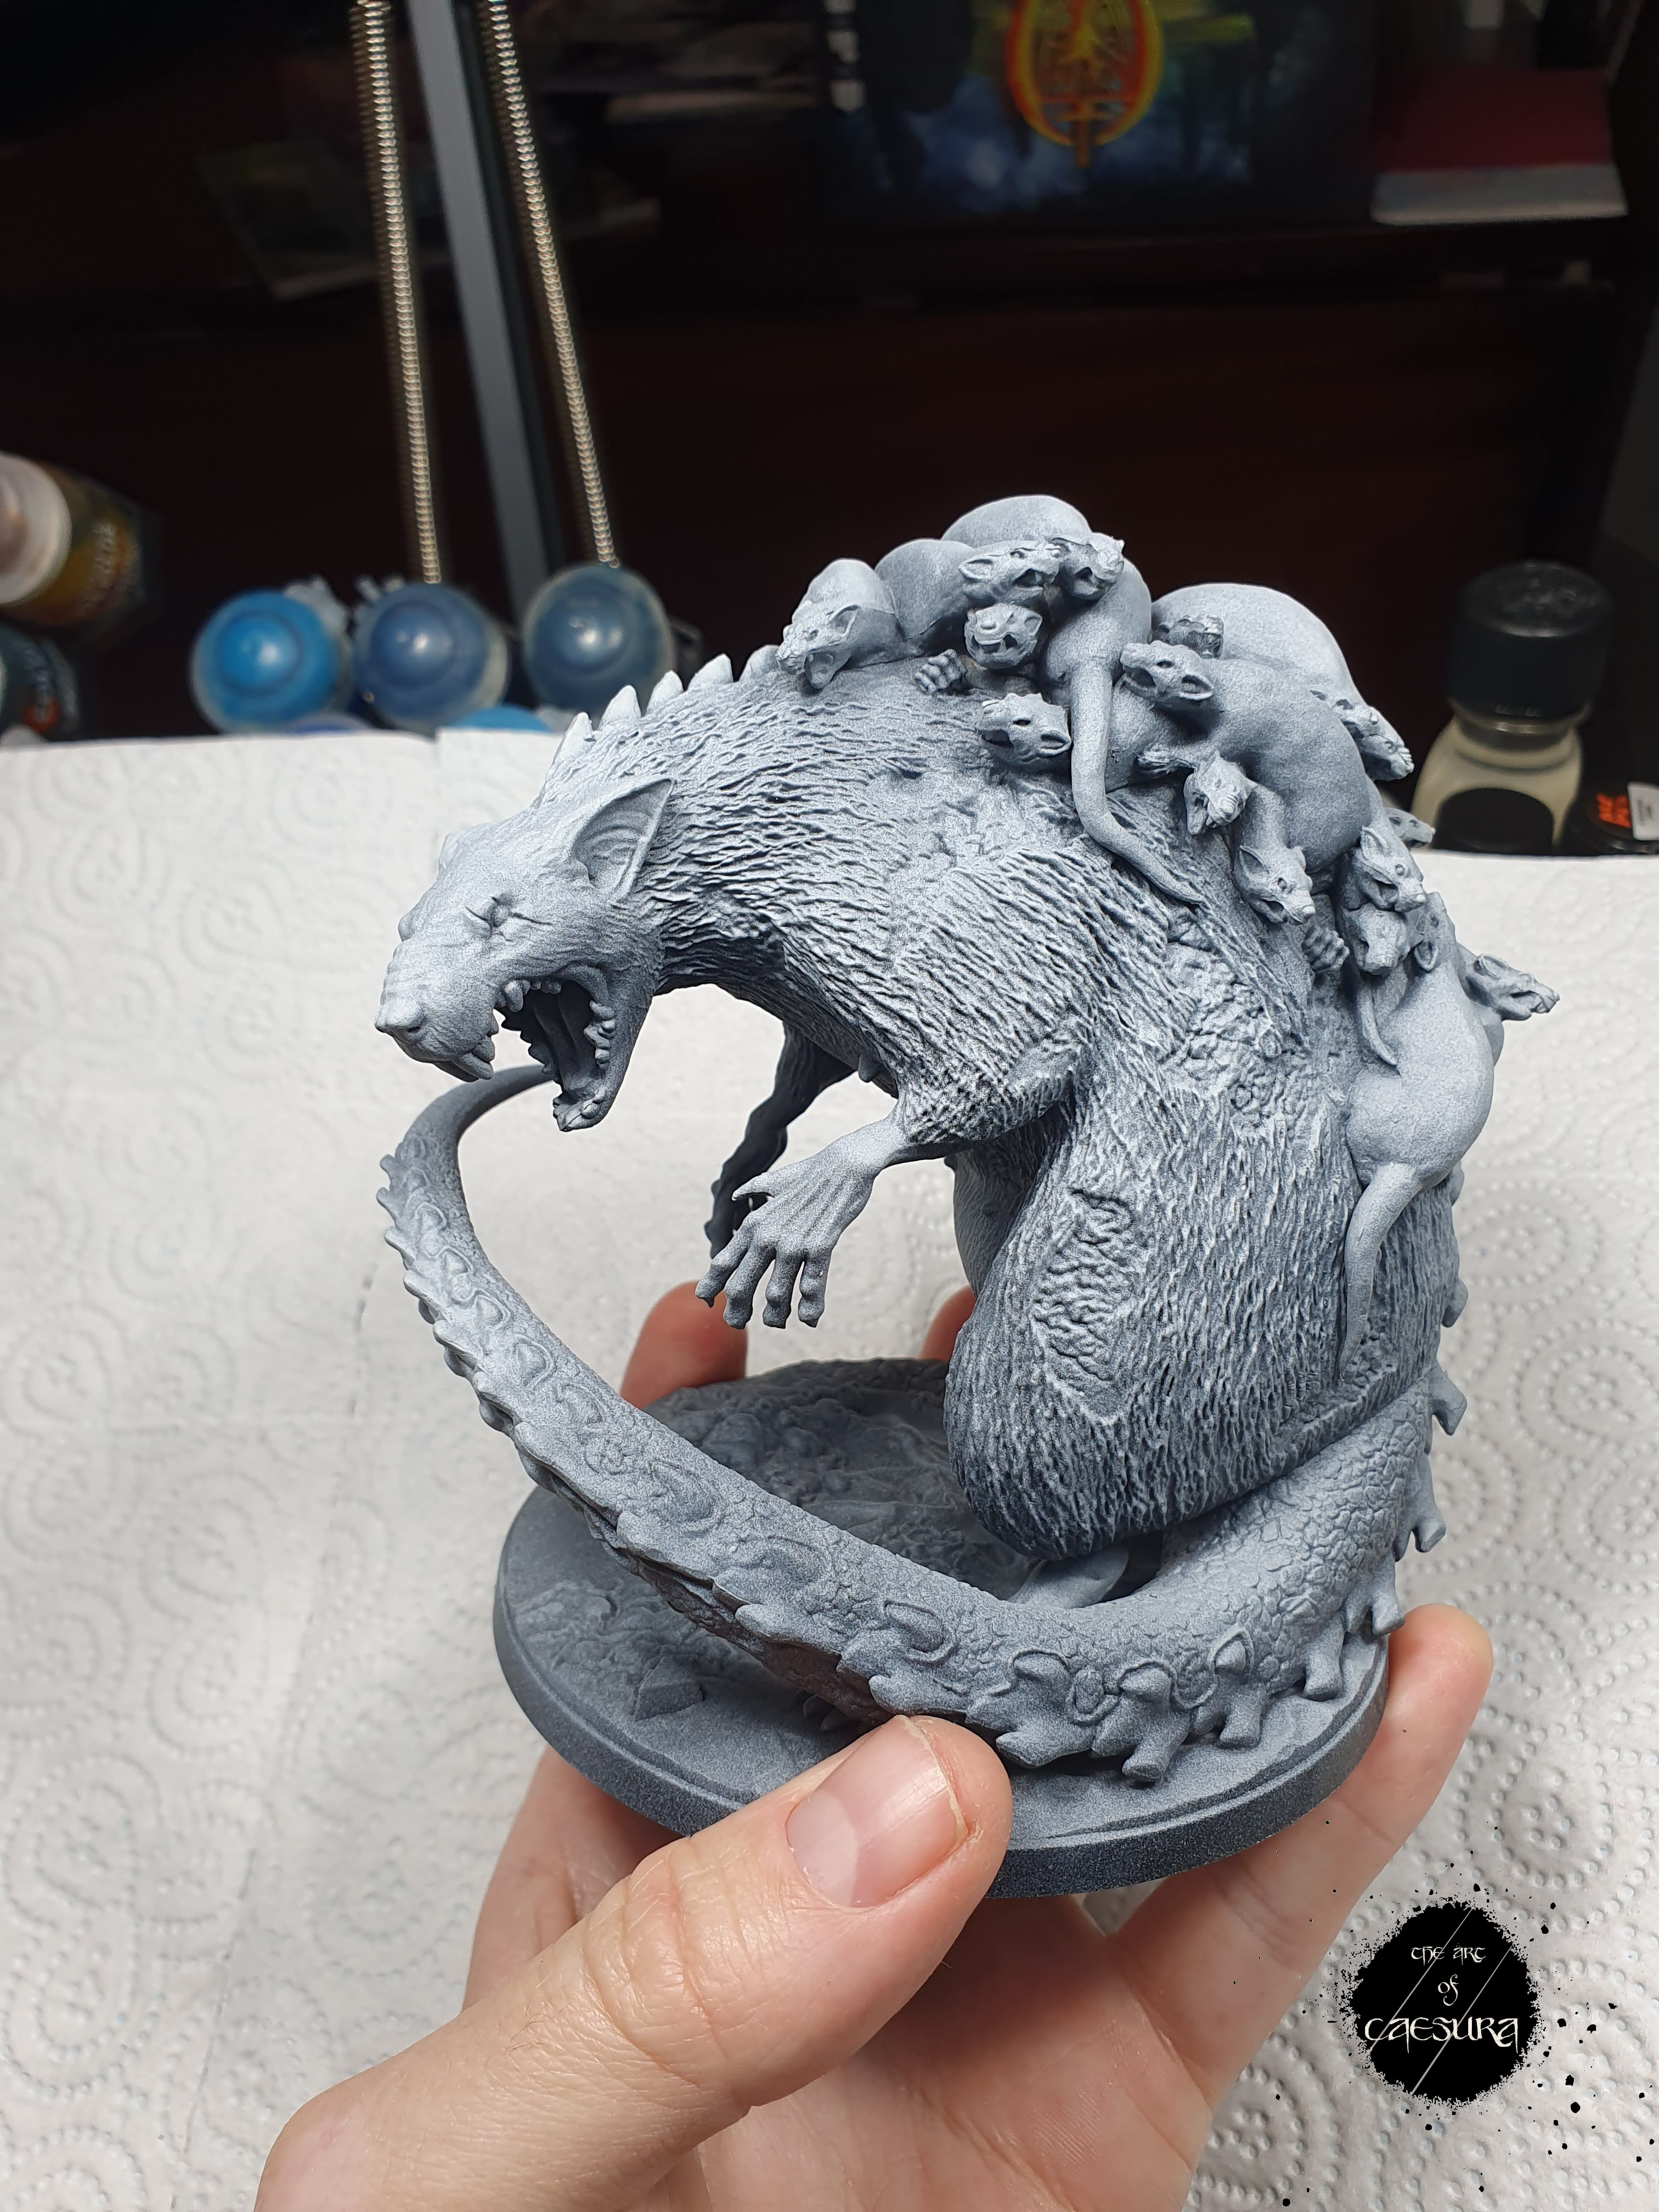
So, today we're painting THE BROODMOTHER!!

This model is one of the poster-boys of Oathsworn. It is the first boss in the game and as such is the only one that people can show off and discuss without the need for a spoiler warning. It is also on the game's box art.

Before we begin, I want to repeat what I had said about my painting goals for Oathsworn. I want to get these models done efficiently to a level that I am happy with. I got this lovely lady done in under 4 hours and I'm pretty happy with that. I want to emphasize that this post is so long because I was uncharacteristly diligent with my work-in-progress pictures, not because the process is complex.

Some tips for painting big models quickly:
1) Use a big brush!
2) Drybrush
3) Spend time and attention on the areas that warrant it: Faces, bases, hands / weapons, and zip through the rest of it.
4) Move on to other areas while one part is drying.

As I mentioned a few weeks ago, I painted the mass of rats on her back at the same time as I painted the Giant Rats. So as not to flog a dead rat, for details on that painting you can check that post out.

For a quick summary, I sprayed the whole model: Black, Grey and then White from increasingly higher angles. I then painted the rats: Skeleton Horde, Fyreslayer Flesh (tails)

Then AK Interactive's Streaking Grime all over (removed with White Spirits and Cotton buds - should have used make-up sponges), S75 Basic Flesh on the tails.


S75 Pale Flesh for the details on the faces (this step could be omitted or replaced with a light dry-brush).


Great, so now that we have the mini-rats painted we can get on to the meat and potatoes of the post - painting the actual Broodmother herself!


I started by covering her all over with Wyldwood and her bony ridges Skeleton Horde to set a rough base tone.

Whilst waiting for the Wyldwood to dry, I painted the tail Screamer Pink (don't get too excited, I'll be toning this down later).

With the Wyldwood dry, it was time to get to the fun part: drybrushing and shading! I drybrushed Doombull Brown (a medium, red-brown) on all the upward-facing surfaces, emphasizing the face, arms and thighs. I use a make-up brush from the dollar store (Dealz).

Wanting the hands and belly to be lighter, I gave a heavy drybrush (technically an overbrush - where you leave more paint on the brush) of Steel Legion Drab to these areas.

Next, I repeated the process (on the fur, not on the hands and belly) with the lighter Skrag Brown.

And for the hands, feet and belly I drybrushed Bugman's Glow.

The fleshy areas then received a drybrush of Cadian Fleshtone and then Ushabti Bone - which I also painted on the most raised areas of the spine bones.

Uhh...ma'am, you're vertebrae are showing...

The drybrushing was completed with a very light drybrush of Wraithbone on all areas that I had been doing before (fur and flesh) but I kept it extra light on the fur.

Now, on to washes! If I'm applying washes, I like to use them after drybrushing because it cuts down on the chawlky finish that can be left by drybrushing. Here I started by deepening the colour of the tail with Druchii Violet.

I then shaded all of the shadows on the fur (armpit, lower surface of neck, where tail meets body) with Athonian Camoshade (a brown-green). There are a few reasons that I chose a shade with green tones (which I even accentuated later with Biel-Tan as you shall see). Firstly, this game is set in The Deepwood - an all-encompassing forest - so some of the reflected environmental tones would be green. But more importantly, something I learned at the painting class with Marco Frisoni at the beginning of this year, was the use of complimentary colours (those opposite each other on the colour wheel) to deepen shadows. This works especially well when using translucent paints as filters so that the tones (overlying and underlying) meld together. The fur was a reddish-brown, so opposite of that is dirty green - Athonian Camoshade, voila!

I gave a unifying (and de-chawlkifying) glaze of Seraphim Sepia over all of the fur.

I then painted the wounds, and the fur surrounding them with Reikland Fleshshade (a red-brown shade). This would both contrast the green tones (creating more visual interest) and give the idea of the wounds oozing into the fur.

I accentuated the effect of the Reikland Fleshshade with Carroburg Crimson (a red shade).

I then accentuated the Athonian Camoshade (as described above) with Biel-Tan Green.

Finally (in terms of the washes) I painted Agrax Earthshade over the areas where the greens and reds and browns meet to unify them a bit.

I then dropped a bit of Nuln Oil into the Broodmother's left eye. I knew I was going to paint this as a blasted eye to go with the scarring, so this step would create some nice shadowy depth.
And that was it for the drybrushing and shading. This whole process (bar the little rats on the back) probably took about an hour and was loads of fun, because there was no need to be tidy.

This next step is controversial (even within my own mind) - I'm still not sure if it was an improvment. I then coated the whole thing in Streaking Grime's brother "Dark Brown enamel wash". My rationale was that I wanted to intensify the "Grimdark" and create even more contrast between the Broodmother and the ratlings on her back.

Once I removed much of the enamel wash with white spirits, I was satisfied that the brown had been converted to a darker, colder brown than before. Unfortunately this knocked back a lot of the fun shading I had done, but I think it's still visible...if you squint.
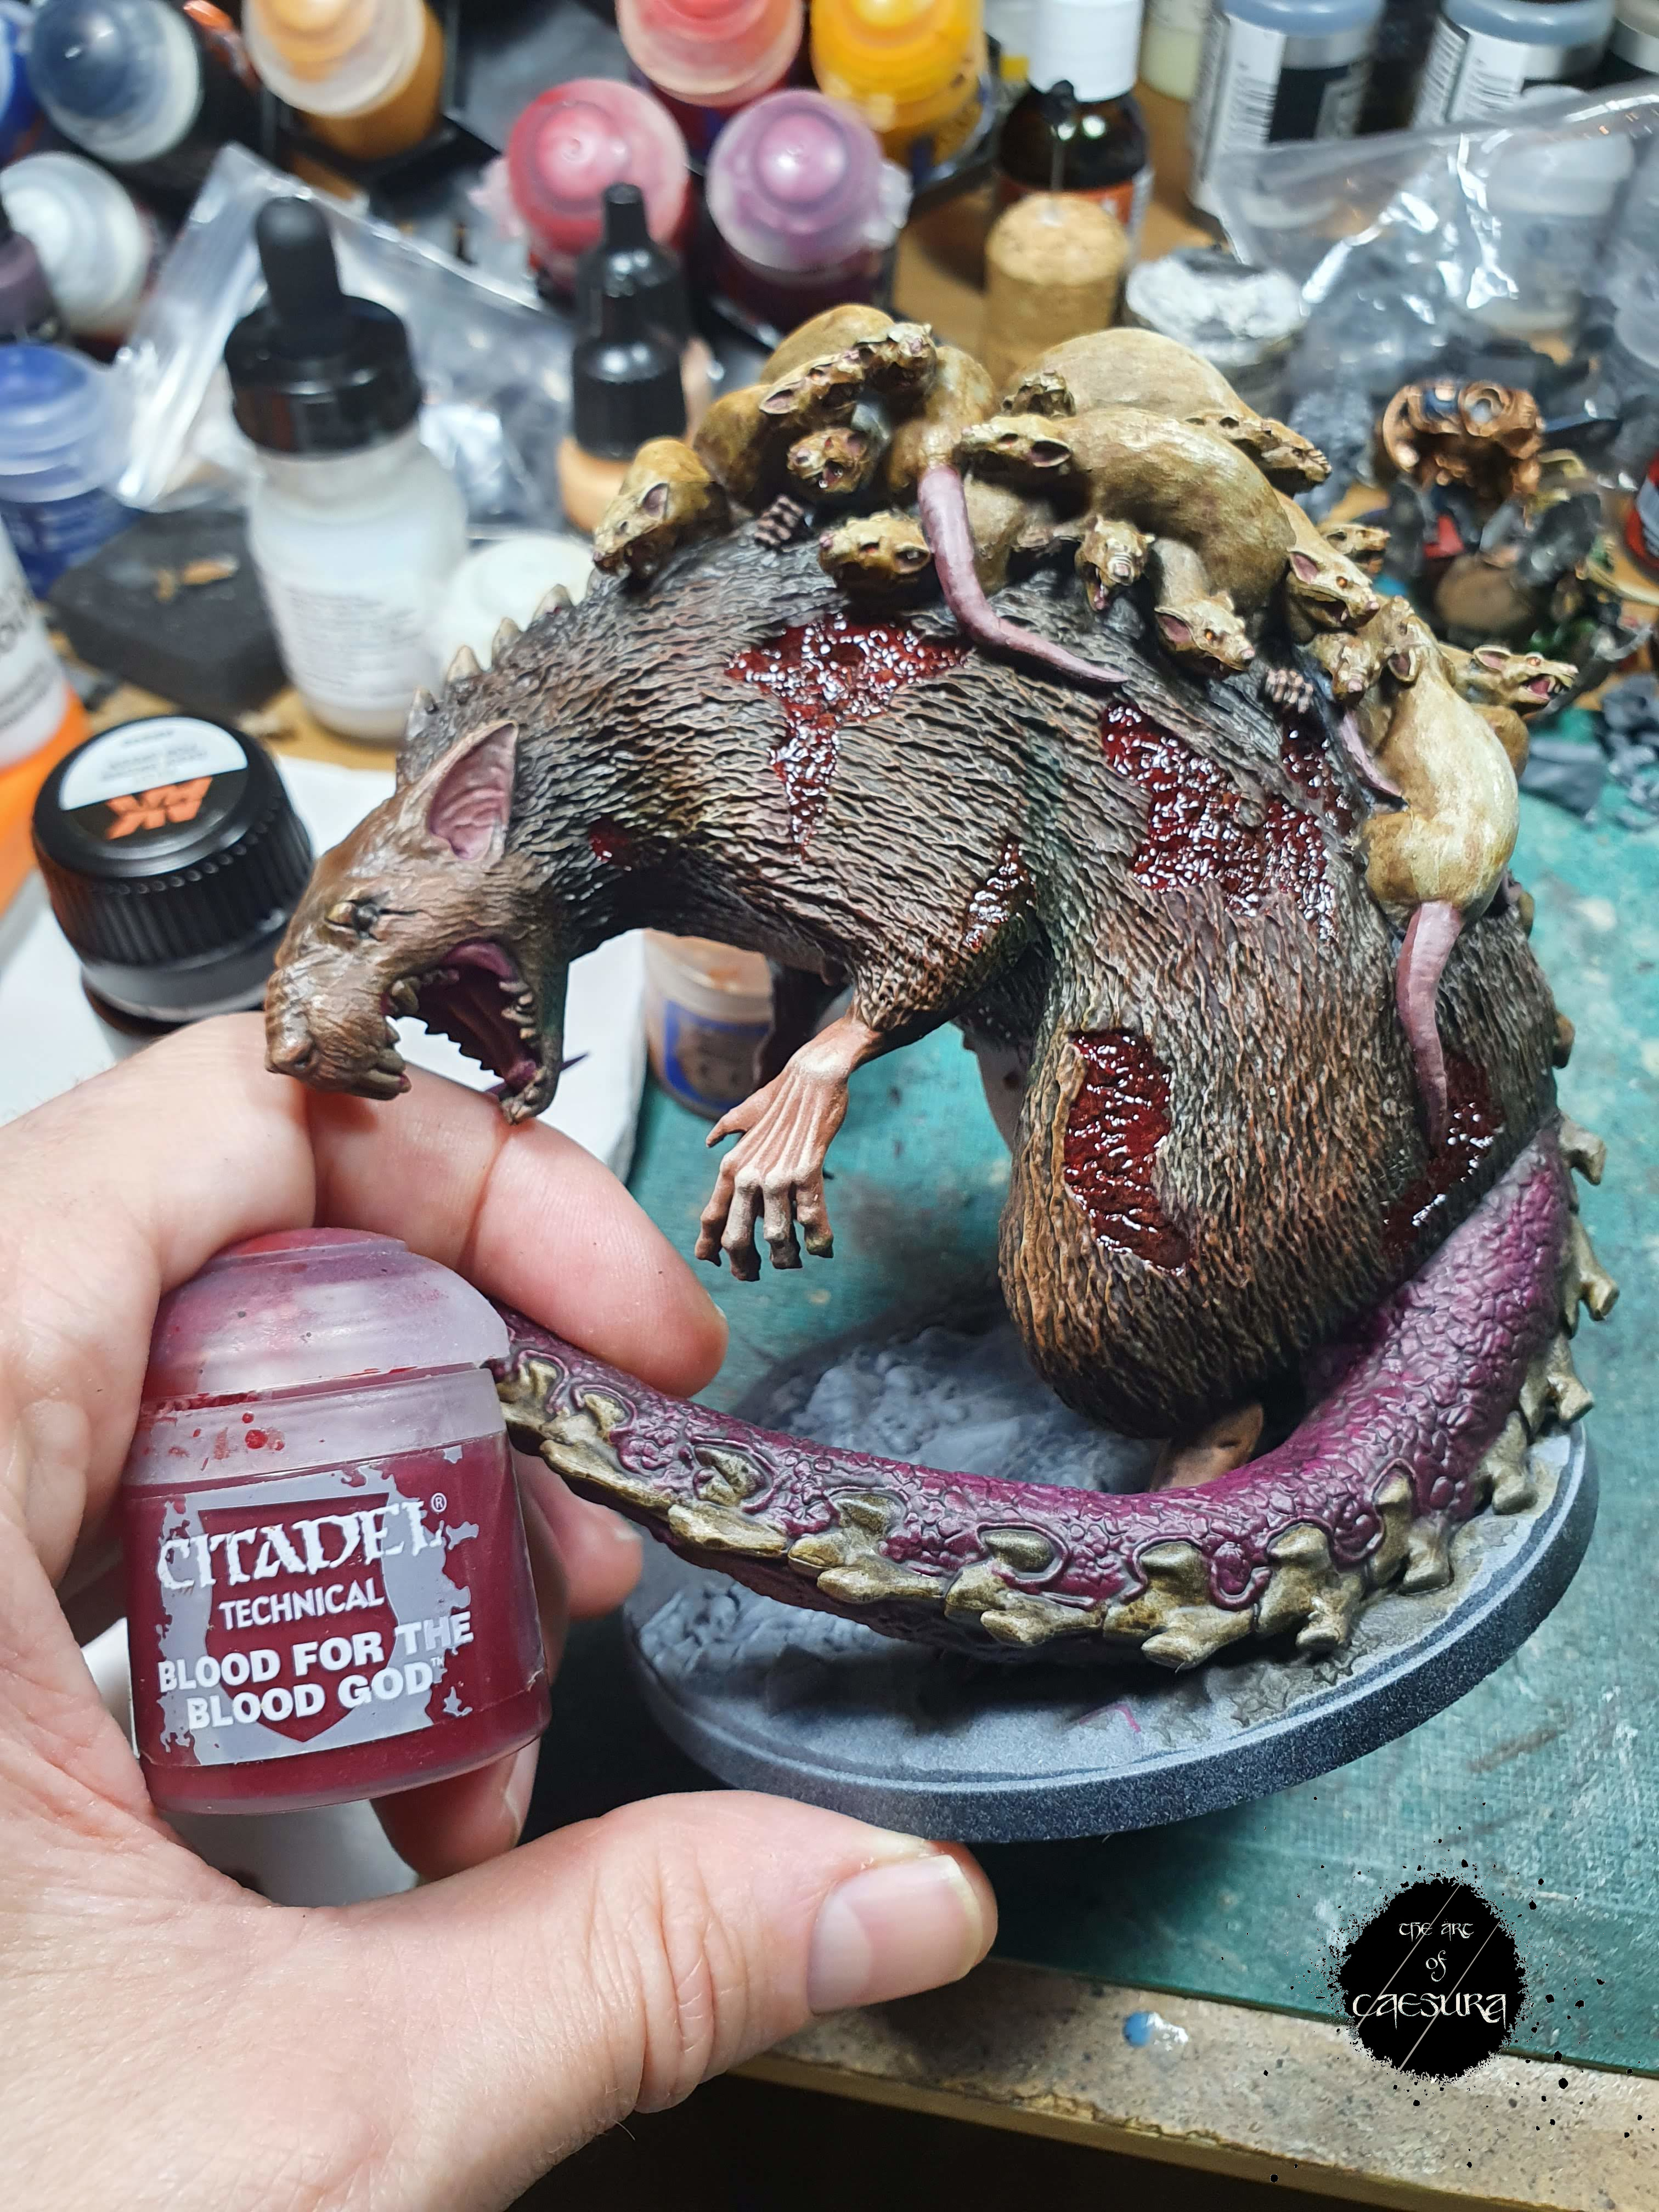
Ow! Gerroff me finger! Anyway, I then added Blood for the Blood God (neat) to all the wounds.

We're really getting close now!

With the body done it was onto the details. Remember at the beginning I suggested spending your time where it's going to pay-off? That's here. For reference, I probably spent an hour here on the head.
I painted the mouth and ears at the same time as the tail, but after Druchii Violet, I drybrushed in some S75 Basic Flesh.

Next came both eyes and the teeth, which I painted with Ushabti Bone, further coating the teeth with Agrax before re-highlighting them with Ushabti Bone.

Here came the fun part! Having watched some play-throughs of the first mission, I have seen that the Broodmother has an "acid spit" type attack. To represent this on the model, I first started by dropping some Nurgle's Rot around the lower jaw and teeth. While that was drying, I went back to the eyes.

I painted the right eye Mephiston Red then deepened it with Flesh Tearers Red...

...before mixing Yriel Yellow into Mephiston red to highlight it. I gave the left eye a quick glaze of Wraithbone and then coated both eyes with gloss varnish.
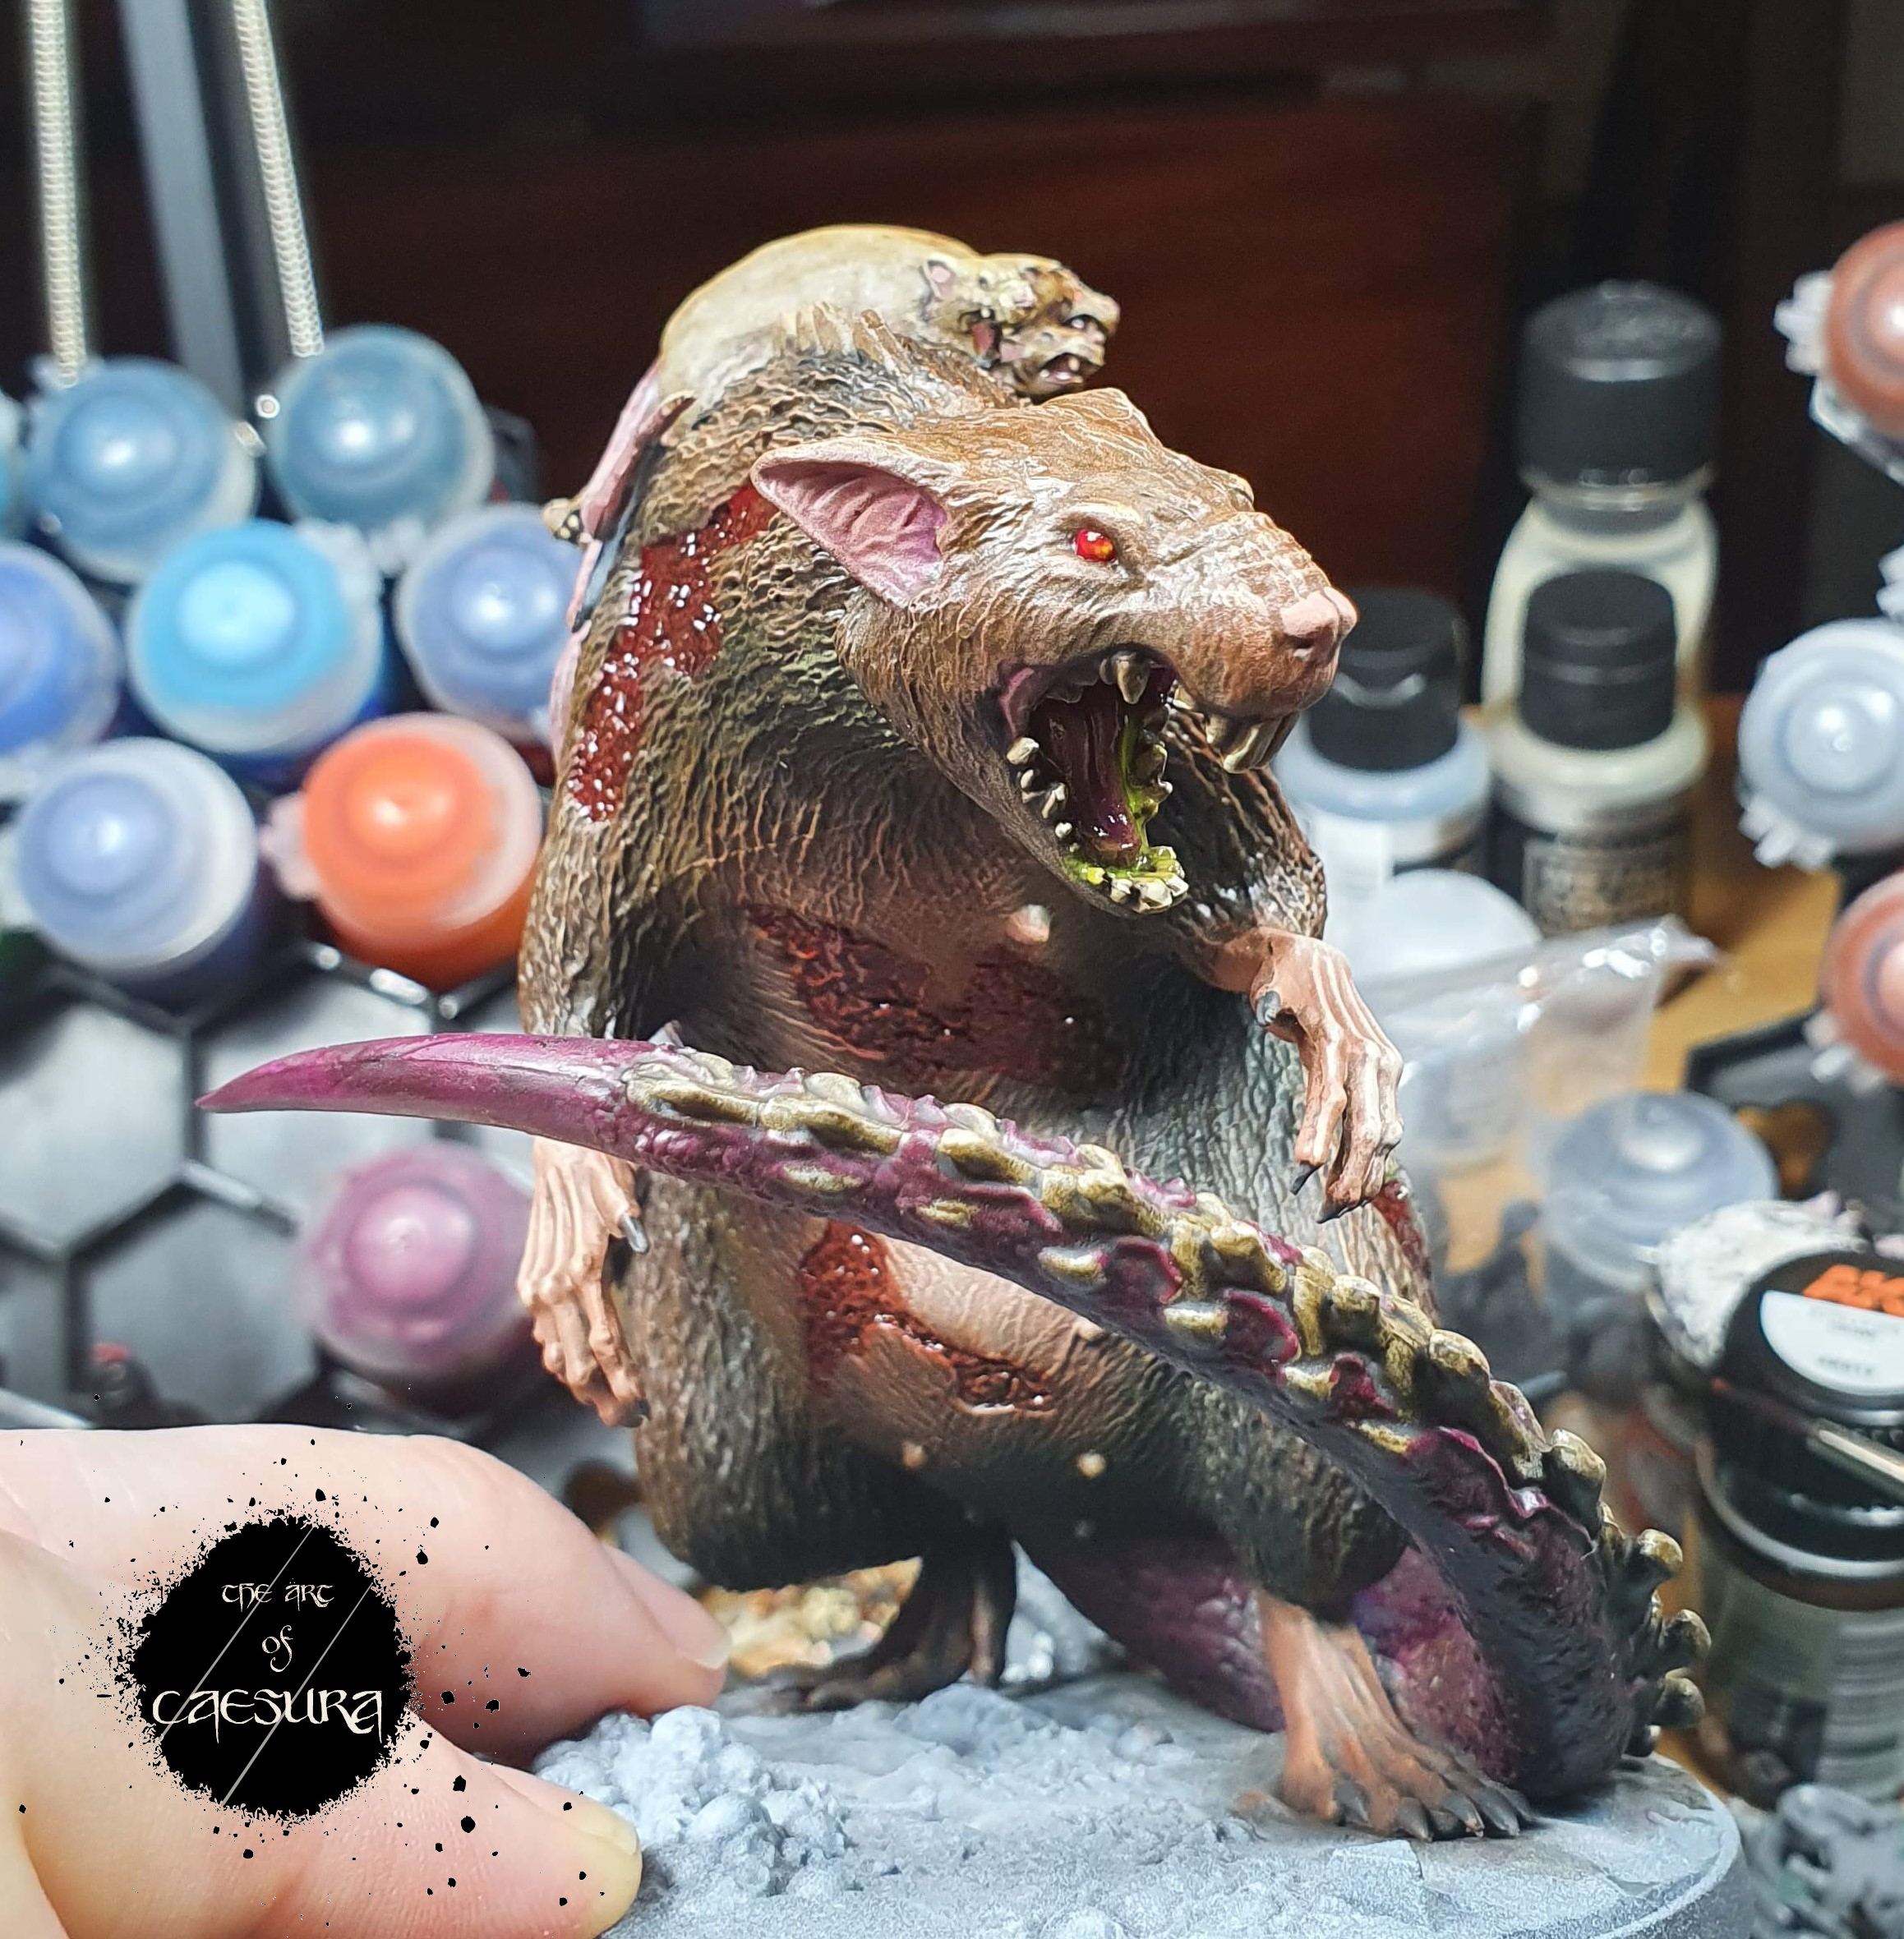


Now that the eyes were done, it was time to return to the maw.

I wanted to try out a technique that I had seen before, but never attempted - the ol' UHU glue saliva trick. Until recently I hadn't been able to find the "universal" UHU glue - which apparently is the one to use. When I saw it in Dealz (yes, where I got my make-up brush...uhhh I mean drybrush), I grabbed a tube.

I didn't get any pictures of the process, because, not having used UHU glue before, I wasn't sure how fast it would dry (not very fast, as it turns out).

All I did was mix a bit of fluorescent green, Nurgle's Rot and UHU glue together on a plastic wrapper using a toothpick.

With a little glob of this toxic mixture on the toothpick, I just touched areas of her mouth where I wanted the strands of acid saliva to attach.

Unfortunately these close-up photos got a little over-exposed, making everything look a bit brighter and shinier than it actually is. The toxic spittle is vibrant, but it's not quite as luminous as it appears here.


With the momma rat complete, it was time to tackle her base. I used the same steps that were outlined in my post dedicated to how I'm doing my Oathsworn bases, but she also has a nice pile of presumably regurgitated skulls on her base, so I started those first.

The only difference I made when preparing to paint a base of this size is that: for the "smaller" Giant Rats I just let the overspray of the Grey rattle can form the basis for painting the base. On the Broodmother I intentionally hit the base with an all-over grey spray and then picked out the skulls with the white ink from my airbrush. I then painted the skulls and other bones with Skeleton Horde.

The rest of the process was exactly the same as before: Militarum green, Creed Camo, Wyldwood, Dirty Down Moss, Gloss Varnish

For the skulls, I layered Steel Legion Drab over the Skeleton Horde...

...and then highlighted them with Rakarth Flesh. Both of these tones are quite neutral, to avoid drawing too much attention away from the hulking rat looming over them.

With the skulls highlighted, I then coated them in Nurgle's Rot to show that they were recently regurgitated. Tasty.

And then, to finish off the model, it was just the last few steps on the base that I mentioned above.


Thanks for joining me for this epic post! See you next Friday, right here on The Art of Caesura!
Watching: Rings of Power
Next Week:
Getting old(er)...
Comments
Post a Comment
Tell me all...