
Every action you take
is a vote for the type of person
you wish to become
- Atomic Habits, James Clear
Welcome one and all to The Art of Caesura!
I hope you are all well! I am a touch under the weather at the moment, but surrounded by old friends and a loving family, so life is good!
Today's is a special post, one that I have been planning for ages (over a year, in fact!) but, recognizing the monumental task at hand, had not built up the courage to actually execute it until now. Today, I present for you a master recipe and process for how I paint my Black Templars for Warhammer 40k.
I like to paint my Black Templars using the gritty verisimilitude of the Grimdark style. I have drawn a lot of inspiration from the work of Christof Keil (@k03rnl online).
In a concerted effort to make this post as thorough and useful as possible, I have raked back through all of my Black Templars posts to try to find the pictures that best illustrate each step. So rather than seeing one single miniature painted to completion (as is our wont), you will see lots of different pictures showing the same process across different miniatures. You will find a list of all paints used at the bottom of this post.
So, without further ado, please enjoy my Black Templars method!
Black Armour:
1) From a Chaos Black spray, I touch up the main armour areas with Abaddon Black. I then coat the whole model in Stormshield (a satin varnish which helps with the next step).

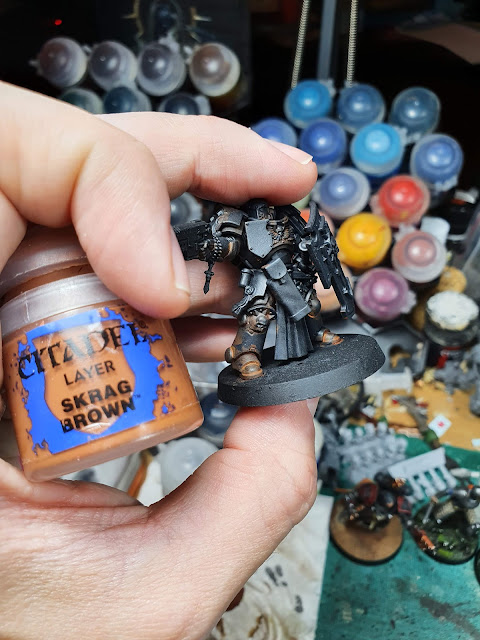
2) I then glaze Doombull Brown and then Skrag Brown into the crevices to give the appearance of dust, and to breathe some warmth into the black armour. As mentioned, the Stormshield reduces the surface tension, allowing the browns to slide nicely into the crevices.


3) With the brown glazed in, I drybrush Abaddon Black onto the areas where the brown got a little out of control (especially the upward-facing surfaces of the armour plates).

4) Next comes Stegadon Scale Green. This is a really fun step. I work really fast, hitting many of the upward-facing surfaces rather than solely edge highlighting. Don't worry if it's looking a little cartoony at this stage.


5) To pull things back towards neutral, I use Skavenblight Dinge next. With this step, I edge highlight most areas and I start to add in the scratches and dings in the armour which will be further accentuated later.


6) After Skavenblight Dinge, I use quite a light neutral grey: Dawnstone - again only on smaller and smaller areas of the edges, upward surfaces, and battle damage which we began to sketch in in the previous step. This layer is applied much more sparingly and less diluted than the previous two steps. It starts to create the hard edges of the armour.


7) Again, don't worry if it's getting a bit too grey at this stage, because for the next step I glaze on Abaddon Black to blend the layers together and bring the whole thing back towards black rather than grey or blue.


8) The final highlight is with Grey Seer, and I reserve that for the sharpest edges that would catch light from above; focusing mainly on the head and gorget (neck armour)


With the small dots of Grey Seer, the black armour (and indeed 75% of the model!) is done!
A note on technique:
While I follow these same steps regardless of whether I am painting a lowly Neophyte or a champion of the Black Templars, I work much slower and more deliberately with heroes / character models. I might thin my initial glazes even more and apply more layers of them to create even more of a gradient.
Pauldrons and Imperialis (Chest Insignia):
1) I start from several thin and evenly applied layers of Steel Legion Drab.


2) I then dab / gently stipple on diluted Rakarth Flesh, followed by a very light application of Grey Seer for combat damage and edge highlights.

Cloth:
To differentiate the cloth from the pauldrons and Imperalis, I move from Steel Legion Drab up through Ushabti Bone to Wraithbone. I give some focused washes of Agrax Earthshade to deepen the folds of the cloth. I try to create a subtle texture to further differentiate the cloth by applying successive layers of thinned Wraithbone in short horizontal lines to give the impression of linen.


Leather:
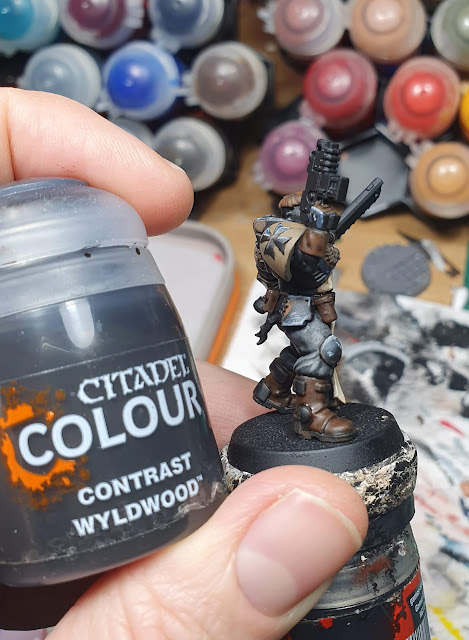
1) I paint all leather elements (pouches, gloves and boots on Neophytes) with Mournfang Brown. This gives some subtle variation from the Doombull Brown used in the initial steps.

2) These areas are fully washed with one pass of undiluted Contrast Wyldwood.
3) I then work back up with Mournfang Brown adding more and more Skrag Brown. I start with volumetric highlighting (highlighting all upward-facing surfaces, much like the first steps of the black armour, rather than just highlighting every edge).

4) I then use small random lines and hatches of Skrag Brown to add wear and tear to the leather.

Red Elements:
1) To paint the iconic red weapon casings and eye lenses, I base them with Mephiston Red or The Red (Kimera Kolors). Personally, I am increasingly using The Red because I find it applies more easily (smooth with fewer layers), but the hues are very similar.


2) I give them an all over wash of undiluted Flesh Tearers Red.


3) I then add more and more Yriel Yellow to the original red to stipple on the battle damage and highlights.


Metals:
Note: Unfortunately, when preparing this post, I realized that I have not been as fastidious in documenting my stages for metalics. I shall try to add more representative photos of each step in the future.
1) I paint all metal areas with Leadbelcher, and for the areas that will remain silver, I give a recess shade of Nuln Oil and then work it back up with Vallejo Game Colour Silver.


2) For brass areas (sword pommels), I simply paint one coat of undiluted Contrast Snakebite Leather over the Leadbelcher. Sometimes I will choose to highlight this with Vallejo Game Colour Silver.

3) For bronze (Shield trim and detailing and Iron Halo on Bladeguard below) I use Sycorax Bronze, shaded with Reikland Fleshshade and then highlighted with Vallejo Silver.


4) And for Copper I use Screaming Bell, shaded with Reikland Fleshshade and highlighted with Hashut Copper.

Finished Examples:
Here are just a few pictures of finished models. For a complete look, simply type "Black Templars" into the search bar at the top of the blog's landing page.


Paints Used:
I include this list only for your own reference of the exact paints I use. The list could probably halved by mixing colours for highlights etc. (something I used to do more); I would, however, advised against mixing colours if you are army painting. It will be much faster over the course of an entire army to own a specific colour rather than having to mix it each time.
Also, these happened to be the paints that I have easiest access to buying, any close colour approximations from the paint line of your choice will likely work just fine.
The last comment I want to make about this sizable list, is that this includes all colours that I have used across my whole army so far. All of these colours would not be required for every model.
Chaos Black Spray
Abaddon Black
Stormshield (technical, satin varnish)
Doombull Brown
Skrag Brown
Stegadon Scale Green
Skavenblight Dinge
Dawnstone
Grey Seer
Steel Legion Drab
Ushabti Bone
Wraithbone
Agrax Earthshade
Mournfang Brown
Contrast Wyldwood
Mephiston Red or The Red (Kimera Kolors),
Flesh Tearers Red
Yriel Yellow
Leadbelcher,
Nuln Oil
Vallejo Game Colour Silver
Sycorax Bronze
Reikland Fleshshade
Screaming Bell
Hashut Copper
Editorial:
Frequent readers will have noted that I reproduce elements of my armour recipe each time I show you my Black Templars. I have done this in case that particular post is your first entry point to my blog and you have not seen me write about my process before. It does however become very samey for my loyal readers and a bit tedious for me if I'm honest.
As I said, I had always intended to produce the post your eyes are now dancing over with delight. My intention is that this post will be an "evergreen" reference that I can link in future Black Templars painting posts so that I may instead spend the time in those posts speaking about particular elements of that specific miniature that catch my interest.
Painting Commentary:
Black can be a very difficult colour to paint. It can just look flat if left alone, but quickly becomes grey or blue if too chunky highlights are applied too thickly. I think my method above creates a really interesting black. It creates almost an artificial chromatic black (black created by mixing two complimentary colours - which tends to have more depth or nuance than just using black paint).
Games Workshop differentiate two of their predominately black Space Marine chapters (Black Templars and Raven Guard) by rendering the first with a warm black (incorporating deep browns and earth tones) and the latter a cold black (incorporating ice blues into the highlights - reflecting the blue/black of raven's feathers). I feel that my recipe draws on both elements (the warm browns in the crevices and the turquoise glazed into the highlights) and for me, this adds more visual interest.
Closing Remarks:
I hope this post has been helpful and enjoyable for you. If you have suggestions to improve it, or questions regarding it, please leave them in the comments section below.
Reading: The Log from the Sea of Cortez - John Steinbeck
Listening: The Fixer - The Bug Club
Next Week:
Bombs away!
Comments
Post a Comment
Tell me all...