Bladeguard Veterans are inexorable warriors,
advancing relentlessly with blades held high –
the very image of noble knights of myth.
- Games Workshop
Welcome back to another Friday on The Art of Caesura!
Twenty twenty-three is a year of improvement for me. I've been reading a bunch of inspiring books with an intention to "live like the kind of person who is making the most of their life". A paraphrased quote from the current book that I am reading (you can always find my "currently reading / watching / listening list" at the bottom of each post) that has resonated with me is:
If you are in the process of making a difficult decision, ask yourself 'does this decision enlarge me or diminish me, will it help me grow as a person or wear away at my soul. Don't base decisions only on what will make you happier, because perceived happiness is often based on comfort.
And what does this have to do with miniature painting? Oh, nothing.
So, did you catch the Adeptacon coverage yesterday? I'll wait a week before I discuss any of it, just in case you haven't yet had a chance to watch it first hand.
Now let us turn our attention to the glorious Bladeguard!
I mentioned last week that I absolutely LOVE these miniatures. They are just so gothic, knightly, and chonky! They are also no slouches in terms of gameplay!
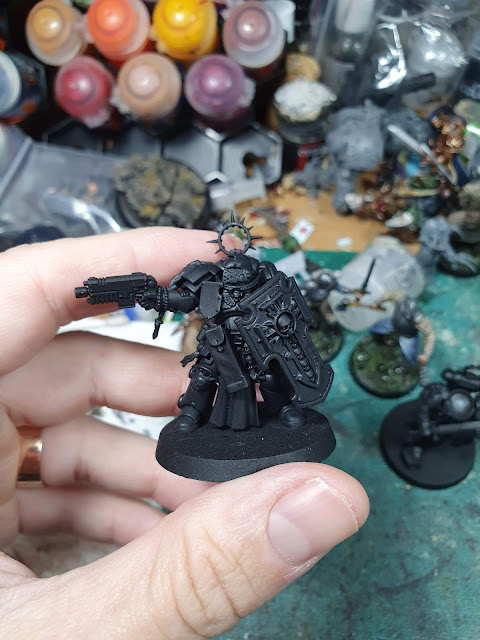
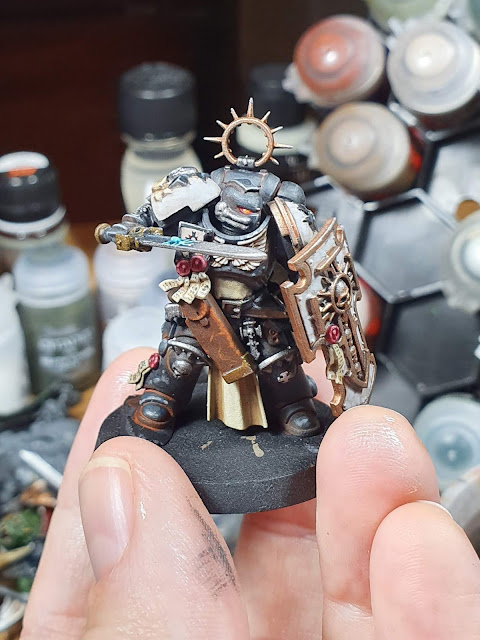
More than most Chapters, Black Templars benefit from a bit of personalization, it plays into their crusading knight aesthetic. This has influenced my sculpting hair onto two of my miniatures so far. On these guys, I dug deep into my olde Black Templars upgrade kit and used pauldrons that were originally designed for Terminators. I also replaced their helmeted heads with old ones; the original Bladeguard helmets are the only thing that I don't love about the models. For me, the eye holes make it look like the Space Marine is wearing a helmet over his helmet. These old parts certainly have softer details than modern bits, but when they're all painted up, they blend in fine.
I have documented my recipe for painting my Black Templars many times now on the blog and I am happy that it is a process that works for me.
I get to start with broad messy strokes and work my way to smaller, more intentional brushstrokes, using all colours that I really like. The overall result has a "Grimdark" "Painterly" look that I adore and it even pleases the "art theory" aspects with the burnt ochre of the Skrag Brown working in a complementary fashion with the deep blue-green of the Stegadon Scale Green.
For those unfamiliar with my process, I shall re-produce it here:
That process is:
1) From a Chaos Black spray, I touched up the main armour areas with Abaddon Black. I then coated the whole model in Stormshield (a satin varnish which will help with the next step).
2) I then glazed Doombull Brown and then Skrag Brown into the crevices to give the appearance of dust and breath some warmth into the black armour. As mentioned, the Stormshield reduces the surface tension, allowing the browns to slide nicely into the crevices.
3) With the brown glazed in, I drybrushed Abaddon Black onto the areas where the brown got a little out of control (the surfaces of the armour plates).
4) Next came Stegadon Scale Green. This is a really fun step. I work really fast, hitting many of the upward-facing surfaces. Don't worry if it's looking a little cartoony at this stage.
5) To pull things back towards neutral, I use Skavenblight Dinge next. With this step, I start to add in the scratches and dings in the armour which will be further accentuated later.
6) After Skavenblight Dinge, I use quite a light neutral grey: Dawnstone - again only on smaller and smaller areas of the upward surfaces.
7) Again, don't worry if it's getting a bit too grey at this stage, because for the next step I glazed on Abaddon Black to blend the layers together and bring the whole thing back towards black rather than grey or blue.
8) The final highlight is with Grey Seer, and I reserve that for the sharpest edges that would catch light from above.
Pauldrons:
Starting from Steel Legion Drab, I dabbed on diluted Rakarth Flesh, followed by a stippling of Grey Seer.
Cloth:
To differentiate the cloth, I moved from Steel Legion Drab up through Ushabti Bone to Wraithbone. I gave some focused washes of Agrax to deepen the folds of the cloth. The image below is taken under a different light which better shows the texture that I am in the process of creating on the tabbard.
Red Elements:
To paint the iconic red weapon casings, I base them with Mephiston Red, give them an all over wash of undiluted Flesh Tearers Red and then add more and more Yriel Yellow to this mix to stipple on the battle damage and highlights.
Metals:
I painted all metal areas with Leadbelcher, and for the areas that would remain silver, I gave a recess shade of Nuln Oil and then worked it back up with Vallejo Game Colour Silver. For the brass areas (sword pommels), I simply painted Contrast Snakebite Leather over the Leadbelcher. For the bronze (Shield trim and detailing and Iron Halo) I used Sycorax Bronze, shaded with Reikland Fleshshade and then highlighted with the Vallejo Silver.
For the titular blades of these guys, I tried my hand at a very simple TMM (true metalic metal) effect. From a Leadbelcher base, I painted cross checks of Contrast Black Templars on either sides of the cutting edges of the sword. I wiped the border with my thumb to smooth out the transition rather than having a stark line where the Black Templars ended and then applied diluted Contrast Black Templars to further blend the transition.
I tried my hand at a little lightening effect on their master-crafted power swords. I actually painted this in white and then filtered it with Aethermatic Blue.
And that is it! These Bladeguard are awesome models and I'm happy to have them slightly individualized with the bits from the old Black Templars upgrade sprue.
I'll catch you right back here next week on The Art of Caesura!
Reading: 4000 Weeks: Time management for Mortals - Oliver Burkeman
Watching: The Last of Us - HBO
Next Week:
Veteran sergeant...


Comments
Post a Comment
Tell me all...